Backpack of Success Skills: A presentation guide

1. ORGANIZATION
Create a new folder
The first phase of the presentation development is gathering data. It is extremely important to stay organized. This begins with creating good names of directories and files. Before you begin to gather evidence to support your presentation create a new folder in your Google drive. Name this folder "BOSS2020_your-Name."
Save all work for the presentation in the "BOSS2020_your-Name" folder.
Gathering Files
You should have artifacts saved in your Digital Backpack of Success Skill folder on your Google account. At the beginning of each school year, the previous school year Backpack of success skills Digital files are archived. Any artifact that you feel is important to your presentation should be copied into the "BOSS2020_your-Name" folder. Making a copy of the work will ensure proper viewing rights (files can be locked and not allowed to edit) will be maintained within another Google application when links are used. Google Slides, or Google Sites will be used as the platform for the defense presentation. A few tricks to learn, but Google Suite is a very user friendly environment.
Some work may be on the JCPS network drive. These files will need to be uploaded to your "BOSS2020_your-Name" folder. If you can't find your work on the network drive you should search computers where you didn't backup the work to your Google drive or JCPS student account. Other locations to check for work: Drop Box, Onedrive, Github, USB drives, your phone for photos, school social media accounts.
Some files will be in your archived JCPS BOSS folder. Follow this link for instructions to locate archived files.
File names
Make sure to use good file names. Use the same name as the title of the document if possible and include your name.
ie:"amazonFire-Essay_tim-brown.gdoc"
Necessary Documented Evidence
You will need a minimum of one artifact for each standard to support your defense presentation. This Google Slide names and describes each standard. This would be a good time to refresh your knowledge on the Backpack of Success Skills Terminology. Follow this link to access BOSS terminology.
- PREPARED & RESILIENT LEARNER
- Academic Performance Data
- LITERACY
- NUMERACY
- GLOBALLY AND CULTURALLY COMPETENT CITIZEN
- EMERGING INNOVATOR
- EFFECTIVE COMMUNICATOR
- PRODUCTIVE COLLABORATOR
- SCHOOL SIGNATURE ITEM:
- Business/Finance - Ethical Leader;
- STEM - Self-Aware;
- Tech & Design - Technology Minded.
PREPARED & RESILIENT LEARNER - Literacy & Numeracy
The idea of using an artifact or artifacts to support your academic growth within the scope of numeracy (Math) and literacy (Reading/writing). Using Academic Standards Test, ACT, MAP, and so on. Plans, practice, what did you do to improve?
~Rubric:
- RIT and/or ACT/SAT scores for both reading and math.
- Student generated goals and a thoughtful reflection specific to improving RIT and/or ACT/SAT scores.
- At least one artifact for both literacy and numeracy demonstrating command of 12th grade ELA/MA Standards.
You will need One unique artifact for each BOSS standards:
- GLOBALLY AND CULTURALLY COMPETENT CITIZEN
- EMERGING INNOVATOR
- EFFECTIVE COMMUNICATOR
- PRODUCTIVE COLLABORATOR
- SCHOOL SIGNATURE ITEM

Checklist
Checklist
Each project can represent only one standard. Projects will cover more than one category, using the BOSS 2020 checklist you should find the strongest fit. More information to come about the checklist. At this time search any archived folders for additional assignments to use for your defense. Save all the projects that you feel have value. As the artifacts are cataloged into the checklist the lightbar will display where criteria was met thus visually displaying the strengths of the artifact. Catalog artifacts, as you tab through them you can see where projects alights to different standards. Use each artifact for it's strengths. 8 total artifacts using a unique artifact for each standard. So get organized and gather files. For each artifact you use write a summary: [describe the project] [describe your role] [what was the highs and lows] [the major take away] [describe your academic growth]
Helpful Files
Files to have ASAP. Some of these are not required but will help you when you create other written documents that are.
This would be a good time to make sure to have these files in your "BOSS2020_your-Name" folder:
- ILP
- HS-transcripts
- Resume
ILP- is a state requirement, also included on the Backpack of Success Skill Defense rubric. That should be worth a few points. It won't require much of your time to complete. You will need your HS transcripts to fill out a part about the classes you have taken. So this would be a good time to get a copy of your transcripts saved too. Follow this link to access a blank ILP form.
HS Transcripts - handy for resume building and for ILP. So this would be a good time to get a copy of your transcripts. Follow this link How to Find your Unofficial Transcripts
Resume - you should work on it soon! If you have one, please review the resume lesson, there may be beneficial information. Follow this link How to write a Resume
So you have everything above all ready to go? Then double check that you have identified all items to use for your defense; follow the outline link below.
If you have not visited room 117, this is a good time to stop by to see the Tech and Design support staff. Many will be there to assist you in gathering data, organizing your files, development of the presentation and design support.
Next: Instructions for writing components: see outline
2. Creating an Outline
Necessary Documented Evidence
Using the BOSS standards and project titles, generate heading and subheading for each:
- PREPARED & RESILIENT LEARNER
- Acedemic performance data
- LITERACY
- NUMERACY
- GLOBALLY AND CULTURALLY COMPETENT CITIZEN
- EMERGING INNOVATOR
- EFFECTIVE COMMUNICATOR
- PRODUCTIVE COLLABORATOR
- SCHOOL SIGNATURE ITEM (select one)
- Business/Finance - Ethical Leader;
- STEM - Self-Aware;
- Tech & Design - Technology Minded
Setting Heading and Subheading
It is important that you make clear connections between what you have determined as an appropriate artifact to align with one of the standards. You have to make that connection for the audience visually and audibly. The presentation slide should include the name of the artifact/project and the standard that it aligns. This will insure each audience member can easily follow your storyline.
You decide between the BOSS standard or project title for use of heading or subheading. Using the structure of heading and subheading generate headings and subheadings for each of the 8 categories. Use the name of an artifact/project with each standard. Each project can represent only one standard. Projects can cover more than one category, using the BOSS 2020 checklist you should find the strongest fit.
Copy and paste each of the summaries from the checklist, next: additional writing components.
- Heading - Name of project
- Subheading- BOSS Standard
- Summary: [describe the project] [describe your role] [what was the highs and lows] [the major take away] [discuss your academic growth]
To review the standards click this link Backpack of Success Skills Standards
After writing artifact Headings, subheadings, and summaries.
Next: Instructions for writing components: see additional writing components
3. Writing Components
STRONGLY ENCOURAGE YOU TO INSTALL GRAMMARLY INTO YOUR GOOGLE BROWSER
Link to writing prompts
Consider using tools such as Grammarly- writing assistant tool.
Writing support
Several teachers have signed up to assist you with the writing components for your presentation. Before sharing your work consider using tools such as: Grammarly or Google Docs (Tools> Spelling and grammar…) to check your work. When you are ready for assistance make sure to provide permission to "edit."
See Mr Brown in room 117 for list of support agents
Example of formatting , Follow formatting example when you share it with a language arts specialist.
REFLECTION OF ARTIFACTS
You have these from the checklist copy and paste
Summary for each artifact:
(Prepared and Resilient Learner (Lit & Num),Globally and Culturally Competent Citizen, Emerging Innovator, Effective Communicator, Productive Collaborator, School Signature Item)
For each artifact: describe the project, describe your role, what were the highs and lows, the major take away, describe your "academic growth."
Continuing on the same Google doc as your summaries from your outline, add the following:
SCHOOL SIGNATURE ITEM - Academic performance indicators
STUDENT INTRODUCTION
-
High School Experiences:
- Introduces themself to panelist.
- Student provides a brief bio about high school experience, interests, extra-curricular activities, plans ,etc.
- Student showcases evidence of academy work.
- Student reflects on their selection of their academy and their experience
- Student demonstrates how their Academy has prepared them for life after high school for college and/or career field
- Student reflects on internships, volunteer work, apprenticeships, work experience or dual credit enrollment, etc. that directly relates to post-secondary plan.
- Students lists awards, certifications: IC3 Fundamentals, IT Fundamentals specialized skills or trainings, etc. received that directly relate to post-secondary plan.
- Student presents a specific plan for after graduation that includes either their career or college track.
- Student outlines a timeframe for which this plan will be accomplished and
- Student lists exact steps needed to achieve plan and
- Student presents evidence of either research into plan or goals already met towards plan (i.e.: acceptance letters, job offers, etc.) PREPARED AND RESILIENT LEARNER
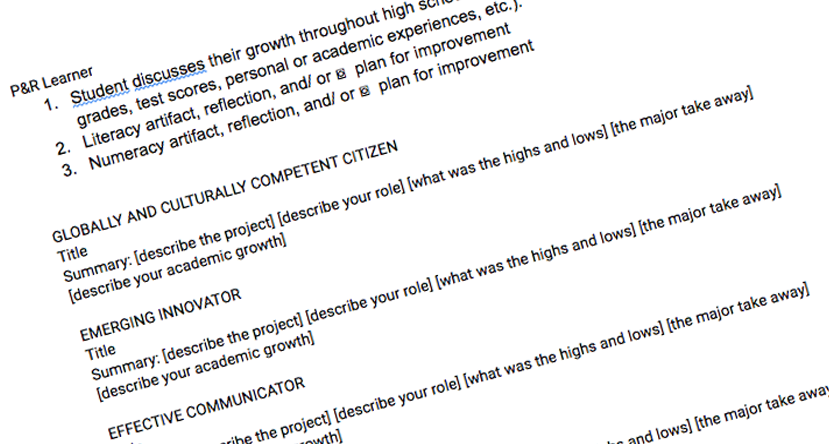
- Student discusses their growth throughout high school (this could be a reflection of their grades, test scores, personal or academic experiences, etc.).
- Literacy artifact, reflection, and/ or ⌼ plan for improvement
- Numeracy artifact, reflection, and/ or ⌼ plan for improvement POST SECONDARY PLAN
- Student presents a specific plan for after graduation that includes either their career or college track.
- Student presents evidence of either research into plan or goals already met towards plan (i.e.: acceptance letters, job offers, etc.)
- Student showcases evidence of pursuing their plan- college, military, specialized training or job application and/or acceptance letter; scholarship applications and/or award letters, ILP
- Student outlines a timeframe for which this plan will be accomplished
- Student lists exact steps needed to achieve plan
- Reflects on experience of internships, volunteer work, apprenticeships, work experience volunteer experience, or dual credit enrollment, etc. that directly relates to post-secondary plan.Industry Certifications Awards, certifications, specialized skills or training, ACT, MAP, etc. describes pursuit.
- HS Transcripts
- ILP
- Resume* This is a great tool to use for a handout. Especially to highlight skill sets not necessarily mentioned in your presentation.
STRONGLY ENCOURAGED
Handout
Students generate handouts of preference, business cards, resume, flier, supplement to power slide. Most generated a polished resume. (See room 117 for Support). This could include work examples that do not translate well into a digital format. Example: Clay sculpture, or performance.
STUDENT NARRATIVE
Tell a story
What was the one thing that helped you get through high school? Make it the focus of the presentation. Was it music, sports, specializing in an academy? If you naturally tell a story and touch on the artifacts as your story unfolds your presentation will be very engaging for your panelist.
Storyboard your story
Using the narrative, "My life as a Tech and Design Student," develop a storyboard to place the evidence in a natural order of your presentation. This may require you to rewrite parts to include meaningful information regarding connections to various articles. (See room 117 for Support)
MAKE IT FLOW. GRACEFULLY CONNECT ARTIFACTS AS EVIDENCE OF YOUR EDUCATIONAL DEVELOPMENT WHILE YOU TELL YOUR STORY.
The more natural the presentation delivery can become a story the better. I want the requirements from the rubric to not be forced into your presentation or want your presentation to reflect a direct translation from the rubric. In other words, after reviewing the previous recorded defense presentations, all of them made a direct translation from the rubric to a slide presentation showing each article discussing the requirement and discussion its importance and then moving to the next requirement. I do not want to see you using the rubric as a format for presentation. Example of poor delivery: "For the first slide I have my name and Backpack Defense the only thing on the slide. Then each following slide is a step by step delivery of the scoring rubric and how I met the requirement for the rubric. Referring to the scoring guide and showing how the guide asks for 5 examples, here are my 5 examples. Oh, here you want to see my reflection, ok. Here is my reflection….."
LET'S HEAR YOUR STORY.
Let's hear your story, and when you tell this story make natural connections to each artifact as the story goes.
Yes, this is challenging.
Yes, this is hard.
Yes, I can help, but you must be giving your best effort.
Option
Place each artifact in the sequence of the rubric and generate an outline.
NEXT STEPS
While you are word-smithing you writing pieces. This is a good time to begin the design of the presentation.
Next: Choosing visuals: see gather images
4: Choosing Visuals
Create a new folder to gather images
Name the folder "BOSS images"
Choose visual support
Choosing visual representation for each of the 8 standards.
Does not need to be an exact replication of the work.
Could be multiple images,
Video,
Photograph,
Check School Social media for images
Image of you performing the activity
Bad ideas for images
Not a good idea to capture the image of your essay and shrink it to fit the presentation slide. No one will be able to read it. You could crop a portion of the image a place it to use as a teaser. Show just enough of the artifact so that your audience want to see more. Or might provoke a question.
How to get images for my presentation
When you begin to save images it is important to make good file names. Include the project name and number. Example: AmazonFire-1.jpg. You will definitely benefit by including "-number" in the file name, especially when multiple images are used for a single artifact. This level of organization will save valuable time and less stress when you're working with the support team.
Screenshot- To take a picture of the computer screen is called a "screenshot." You can capture the image of the computer monitor by pressing the "PrtScn" button and pasting the "captured image" into a document, paint, or Photoshop.
Images on your phone- There may be images on your phone. To move these you can email them to yourself, or install/use the Google Drive App on your phone.
Images, Adjustments, Scale, Crop
Don't crop or change any of the images at this time. The next step is designing your presentation. You will prepare your images after you finalize a Presentation Theme.
Next: Presentation Platform/Software, selecting a presentation format

5: Digital presentation:
At this time your "copy" should be all in one text document Google doc, etc.. Make sure to have the presentation design completed before placing the words into the slides. When the design is finalized you will be able to copy and paste the text into the presenter's notes. From there you will pull information to bullet-point..
It is advisable to paste the entire copy (writing components) into the first slide presenter's notes for safe keeping.
Choosing a Presentation Software:
Deciding what presentation software to use?
Google Slides
Google Sites
MS Powerpoint
See Design Support in Room 117
Templates are available
Custom design work is available. see design inspiration
When the design is finalized you will be able to copy and paste the text into the presenter's notes. From there you will pull information to bullet-point.
Optional: Individualized Presentations: See room 117
If you haven't spoken with someone about a customized presentation, stop now.
There are student services available to assist you: there are many galleries to choose from, custom design is available, file management organization training, presentation development, Some delivery options could include services to accommodate for voice over and video recordings, pending on students needs.
Tech & Design Support Staff
room 117
Any school hours with a note
A+
Email timothy.brown3@jefferson.kyschools.us
If you would like for a Tech & Design student to assist you with a custom design for your presentation do the following:
Create a new Google Doc.
Name "Your Name_DesignInspiration"
Example of design inspiration example
Designers will generate art for your presentation based on your "Design Inspiration Board."
Use the following headings: 1. Colors I want to use, 2. Textures and Icons that interest me, 3. My Font selection, 4. My Favorite things, and find images to support your interest.
TIPS
How to screen-shot an image.
How to crop and scale and image.
Next: If you have any questions: See
Tech & Design Support Staff
room 117
Any school hours with a note
A+
Email: timothy.brown3@jefferson.kyschools.us
LINKS
____
Link 2 Terms
Link 3 Checklist
Link 4 Blank ILP
Link 5 How to find U Transcripts
Link 6 How to write a resume
Link 7 example of formatting outline
Link 8 Terms
Link 9 writing prompts
Link 10 templates
Link 11 design inspiration
I____
Link 12 How to screen shot, crop, scale and image.
How to find archieved files
By: Noah Melson
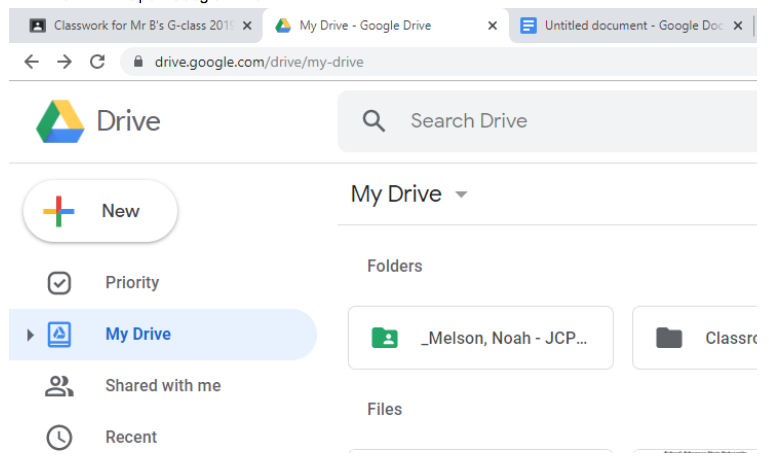
At the end of each school year the Google Drive get archived. Meaning all of your saved documents are placed in another folder than your JCPS BOSS Folder. To locate these file you will need to follow
- Open Google Drive/li>
Once you have google drive opened, click on the folder that says your name
ex. (_Doe, John - JCPS Backpack)
- Open the "Artifacts" folder/li>
There will be 2 folders in there. Click on the folder that says "_Archived"
- Open the "SY 18-19" folder/li>
In the archived folder, click on the folder "SY 18-19"
- Here are the BOSS folders from school year 2018-19.


Backpack of Success Skills
3 MAIN COMPARTMENTS
- Numeracy and Literacy Readiness Descriptors
- The 5 Success Skills
- School Signature Items
- PREPARED & RESILIENT LEARNER Literacy Numeracy
- GLOBALLY AND CULTURALLY COMPETENT CITIZEN
- EMERGING INNOVATOR
- EFFECTIVE COMMUNICATOR
- PRODUCTIVE COLLABORATOR
- Academy Signature: Business/Finance - Ethical Leader; STEM - Self-Aware; Tech & Design - Technology Minded
1: Prepared and Resilient Learner
- Demonstrates knowledge of content skills and standards
- Applies content knowledge to real world contexts and in interdisciplinary ways
- Reflects on successes and challenges, and makes appropriate adjustments in order to meet academic, personal and professional goals
- Employs organizational and project management skills to achieve academic, personal and professional growth
- Sets personal goals for transition readiness, explores post-secondary options and takes actionable steps towards realizing both
2: GLOBALLY & CULTURALLY COMPETENT CITIZEN
- Explores community and global issues from the perspectives of those most impacted and creates actionable solutions
- Employs democratic processes to come to decisions and solutions
- Compassionate and empathetic toward others
- Promotes a sense of belonging for others
- Respects different cultures, perspectives and beliefs
3: Emerging Innovator
- Employs a sense of curiosity and inquiry; seeks to learn
- Asks questions to extend, challenge and clarify the thinking of self and others
- Applies a design process (e.g. research, ideation, modeling, prototyping and testing) to create new solutions, products and processes
- Uses relevant information and feedback to continually improve solutions, products and processes
- Takes appropriate risks, and makes adjustments based on successes and failures
4: Effective Communicator
- Uses appropriate conventions and evidence to convey ideas clearly in writing, verbally, digitally and visually
- Adapts message to purpose and needs of the audience
- Uses discipline-specific writing conventions, formats and vocabulary to communicate ideas
- Uses technology effectively and responsibly
5: Productive Collaborator
- Works effectively with diverse groups to accomplish a common goal
- Gives and receives meaningful feedback
- Assumes personal responsibility for team outcomes
- Actively listens to understand others' ideas and perspectives
6: Ethical Leader - Business and Finance Academy Signature Item
- Aspires to hold themselves and others to honest levels of behavior at all times.
- Demonstrates respect for others in all interactions.
- Equitable treatment, fairness in decision-making, and an advocate for those without a voice when working with peers
6: Self-Aware - STEM Academy Signature Item
- Understanding self-efficacy and why its important.
- Remaining flexible to take advantage of opportunities.
- Recognizing my strengths and utilizing them to improve quality of life for myself and others.
6: Technology Minded - Tech & Design Academy Signature Item
- Uses technology appropriately/effectively/efficiently especially in regards to research.
- Understands basic technologies (electronic, computer, apps)
- Demonstrates use of technology
- Explores new/trending technologies
Literacy Readiness Descriptors
As evidence of being a Prepared and Resilient Learner: 1. RIT and/or ACT/SAT scores for both reading and math 2. Student generated goals and a thoughtful reflection specific to improving RIT and/or ACT/SAT scores. It is especially important to reflect on MAP growth goals. For example, is the student meeting or exceeding his growth goals? If not, what will help make sure this happens? 3. At least one artifact for both literacy and numeracy demonstrating command of 5th, 8th or 12th grade ELA/MA Standards.
Numeracy Readiness Descriptors
"Students will discuss and show their readiness to transition using evidence from their digital backpacks." JCPS BOSS Launch Booklet The idea of using an artifact or artifacts to support your academic growth within the scope of numeracy (Math).. Using Academic Standards Test, ACT, MAP, and so on. Plans, practice, what did you do to improve?
ACADEMY REFLECTION
- How their Academy has prepared them for life after high school.
- Reflects on work towards academy signature skill sets
- Awards, certifications, specialized skills or trainings, ACT, MAP, etc. describes pursuit.
- Reflects on experience of internships, volunteer work, apprenticeships, work experience or dual credit enrollment, etc. that directly relates to post-secondary plan.
- Presents a specific plan for after graduation
- Presents evidence of either research into plan or goals already met towards plan (i.e.: acceptance letters, job offers, etc.).